In the Cash flow forecasts section you plan your company’s cash flow months ahead. You see actual receipts and payments for past months, fill in planned values for future months and watch how the closing cash balance develops. You can work with several scenarios.
Before you start
- Permissions: only a user with the Administrator role can create a forecast. Other users see it if the View cash flow forecast permission is enabled for them on the company.
- Time required: 10–20 minutes (depending on the number of rows and scenarios).
- Have ready: an overview of the planned receipts and payments you want to include, and the dimensions you want to track (cost centers, activities, projects). Dimensions cannot be changed after the forecast is created.
- Check the company settings: the forecast uses values from the company detail, Settings tab – Default VAT rate for revenue, Default VAT rate for costs (conversion of planned revenue and costs into cash flows including VAT) and Overdraft value (the facility available beyond the cash balance). Have them filled in before you start planning.
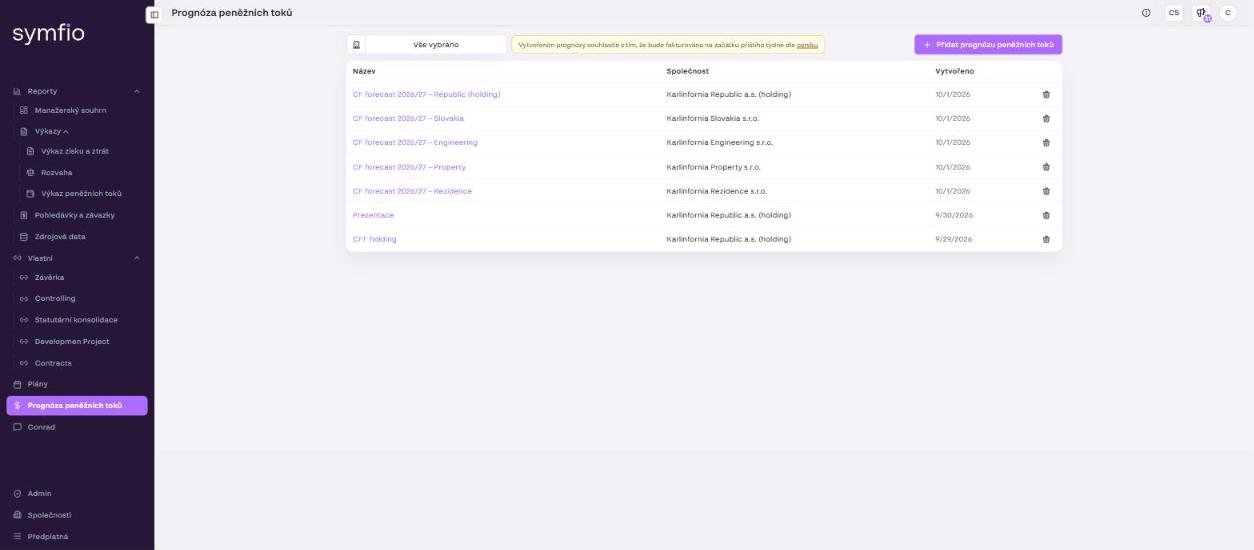
Billing: above the forecast list there is the same yellow bar as for plans: “By creating a plan you agree that it will be invoiced at the beginning of next week according to the price list”. Every forecast you create is charged according to the price list at symfio.app/pricing.
Forecast list
After clicking Cash flow forecasts in the left menu you see the list of forecasts with the columns Name, Company and Created. Click a row to open the forecast; the bin icon deletes it.
Creating a forecast
- Click Cash flow forecasts in the left menu.
- Click + Add cash flow forecast.
- Fill in the form (see the table below).
- Click Save. The forecast detail opens.
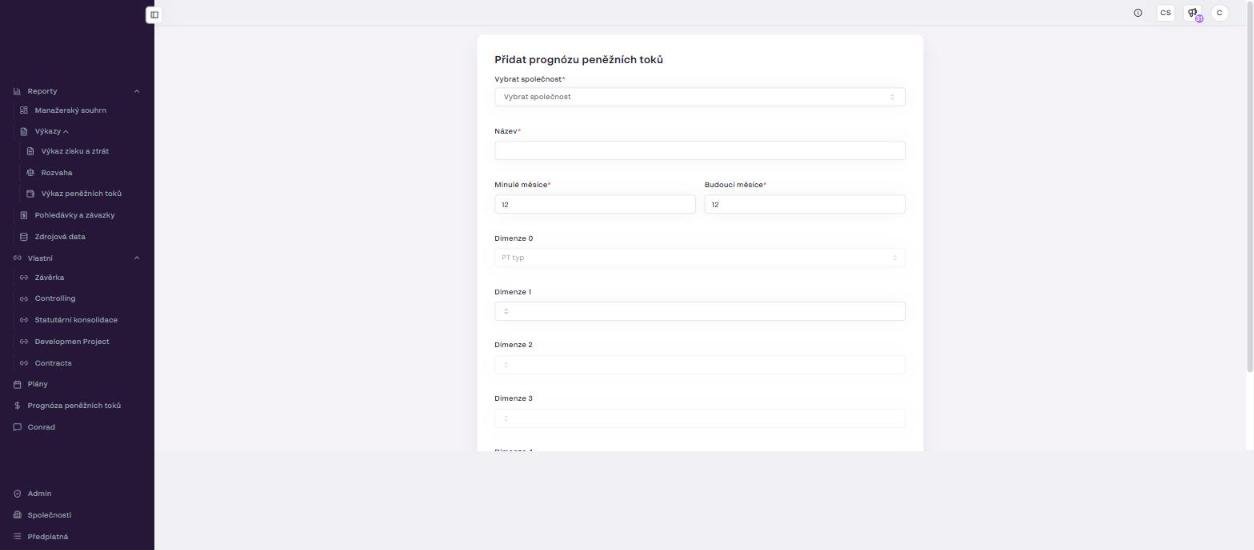
| Field | Required | Description |
|---|---|---|
| Select company | Yes | The company you create the forecast for. |
| Name | Yes | Any name identifying the forecast. |
| Past months | Yes | The number of historical months displayed in the table as actuals. |
| Future months | Yes | The number of months you will plan ahead. |
| Dimension 0 | Yes | Fixed to CF type (cash flow type: Receipt / Payment). |
| Dimensions 1–4 | No | Optional breakdown of the data. |
Setting the dimensions
Dimensions 1 to 4 let you structure the forecast according to your company’s needs. Choose from the drop-down:
- Company name – for group agendas (breakdown by counterparty/company),
- Cost center – cost centers,
- Activity – types of activity,
- Project – project orders,
- CF category / CF subcategory – cash flow categorization (for example Customers, Suppliers, Employees, VAT, Taxes),
- Counter account – counter accounts from accounting,
- Empty – the dimension is not used.
Note: if you do not need all four dimensions, set the unused ones to Empty. A proven structure is CF type | CF category | Company name.
Forecast detail
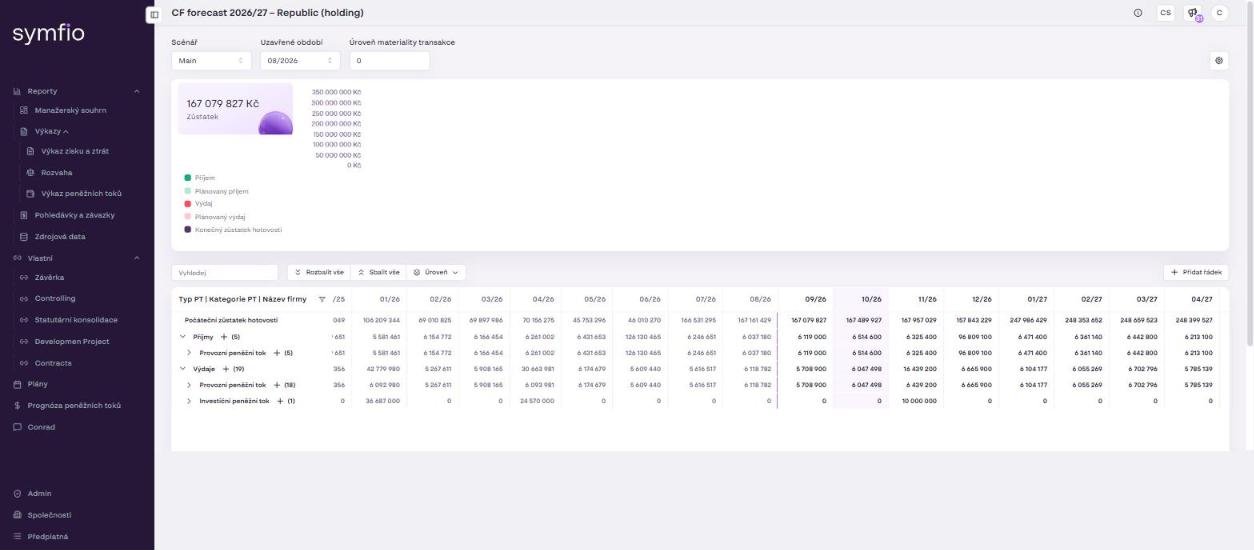
In the detail header you find three settings that affect how the data is displayed:
| Setting | Description |
|---|---|
| Scenario | Switching between the created scenarios (default Main). |
| Closed period | The month up to which the data is actuals (for example 08/2026). Historical data up to this month is locked; planning starts with the following month. |
| Transaction materiality level | The amount below which small items are grouped into the Other category. |
Below the header are the KPI tiles Balance, Receipts, Planned receipts, Payments, Planned payments and Closing cash balance, and the buttons Expand all, Collapse all, Level, Show detail and Add row.
The table has columns by month (past and future) and a fixed row structure:
- Opening cash balance – cash at the beginning of the month; in the first month it is loaded from accounting data.
- Receipts – for example Operating cash flow, broken down by dimensions.
- Payments – for example Operating cash flow and Investing cash flow, broken down by dimensions.
- Closing cash balance – the predicted balance at the end of each month; it becomes the opening balance of the following month.
Note: suspense accounts and internal cash flows are included in the cash balance, but for practical reasons they are excluded from the receipts and payments rows of the forecast table.
Adding forecast rows
- Click Add row.
- Choose the Cash flow type: Receipt (sales, collection of receivables) or Payment (costs, settlement of payables).
- Fill in the values of the other forecast dimensions.
- Confirm with Add row.
Creating a new dimension value
If the value you need does not exist in the drop-down, create it directly in the form:
- Start typing the name of the new value into the dimension field.
- A Not found message with a + button appears.
- Click + to create the new value.
- After filling in all parameters click Add row.
Tip: add receipts and payments separately. For each combination of dimensions (for example cost center + activity + project) create one row for receipts and another for payments.
Entering values
Past months are actuals and cannot be edited. You fill in future months manually, directly into the cells at the lowest level of the hierarchy:
- Click a cell in a lowest-level row in a future month.
- Enter the planned amount.
- Confirm with Enter or by clicking outside the cell.
- After entering all values, save the forecast (Save forecast button).
Values at higher levels of the hierarchy (totals per cost center, total receipts and payments, closing cash balance) are calculated automatically and feed the KPI tiles above the table. The Show detail button opens a more detailed view of the items behind a row.
Transaction materiality level
The materiality level makes the forecast easier to read by grouping smaller items:
- Enter any amount into the Transaction materiality level field.
- All rows with values below this limit are automatically merged into the Other subcategory.
- To return to the original view of all items, clear the field.
Working with scenarios
Each forecast can contain several scenarios, which let you compare different development variants (optimistic, pessimistic, realistic). You switch between scenarios in the Scenario field; each scenario is edited independently of the others.
- Click the Scenario drop-down in the forecast header.
- Select + Add scenario.
- Enter the name of the new scenario.
- Optionally enable Copy scenario to copy data from an existing scenario.
- Click Add scenario.
Managing forecasts
- Opening a forecast: click the forecast row in the list.
- Editing the name and history range: the forecast name and the range of displayed past months can be edited in the forecast settings in its detail.
- Deleting a forecast: click the bin icon in the forecast row.
Warning: deleting a forecast is irreversible. All scenarios and entered data are removed.
Tips and common mistakes
CF categories: for past months to break down correctly into receipts and payments, accounts must have cash flow categories assigned under Categorization › Mappings › Cash flow. Verify the result in the Cash flow statement report.
Statement vs. forecast: the Cash flow statement in the Reports menu shows actuals from accounting; the Cash flow forecast continues it with future months you fill in manually.
Frequently asked questions
Can I change the dimensions after creating the forecast?
No, dimensions are fixed when the forecast is created. If you need different dimensions, create a new forecast.
How is the opening cash balance calculated?
The opening balance is loaded automatically from the connected accounting data (cash at the beginning of the first month). If no data source is connected, the value is zero.
Where do VAT rates and the overdraft enter the forecast?
From the company detail, Settings tab: Default VAT rate for revenue and Default VAT rate for costs convert planned revenue and costs into cash flows, and Overdraft value defines the facility available beyond the balance. Reopen the forecast after changing the settings.
Can I export the forecast to Excel?
Forecast data is also available in Reports › Source data on the Cash flow plan tab, which has an Export button.