Before you start
- Permissions: only a user with the Administrator role can create and edit plans. Other users see plans if the View income statement plans permission is enabled for them on the company.
- Time required: 5–10 minutes to create a basic plan, then depending on the number of rows.
- Have ready: an overview of the dimensions you want to track in the plan (cost centers, activities, projects), the accounts from the chart of accounts you will plan on, and the planned revenue and cost values by month.
Billing: above the plan list there is a yellow bar saying “By creating a plan you agree that it will be invoiced at the beginning of next week according to the price list”. Every plan you create is charged according to the price list at symfio.app/pricing. Create plans deliberately and delete test plans you do not need.
Tip: before creating a plan, decide on the granularity you want to plan at. You can plan at the level of individual accounts, cost centers or their combinations. Dimensions cannot be changed after the plan is created.
Plan list
After clicking Plans in the left menu you see a list of all plans with the columns Name, Company, Type (Budget / Forecast) and Years (for example 2024-2026). You can narrow the list with the company filter (default All selected). The bin icon at the end of a row deletes the plan.
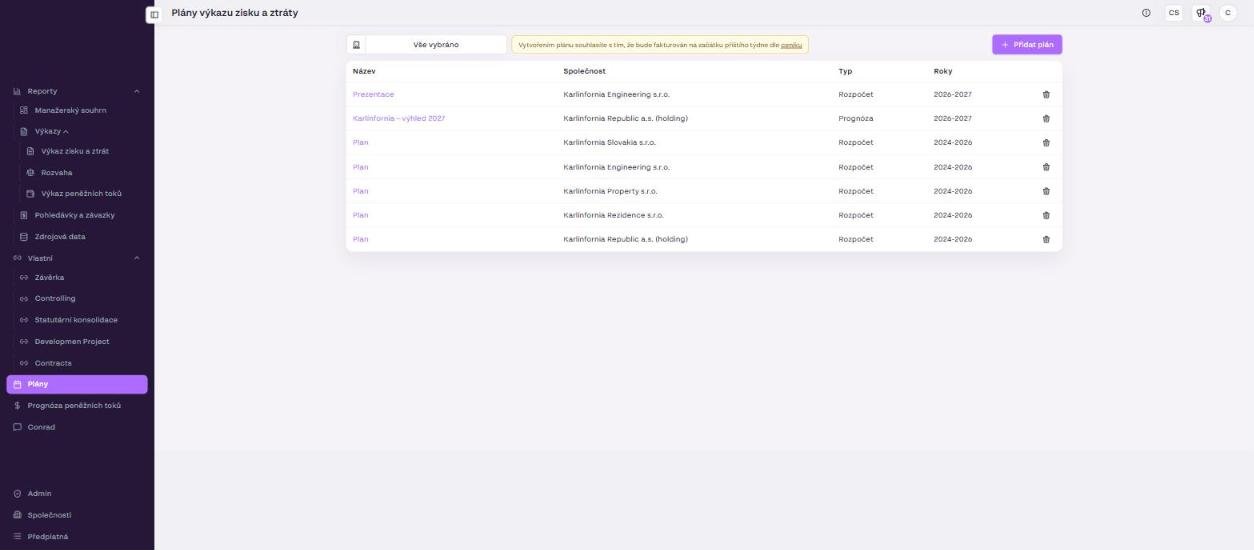
Creating a new plan
- Click Plans in the left menu.
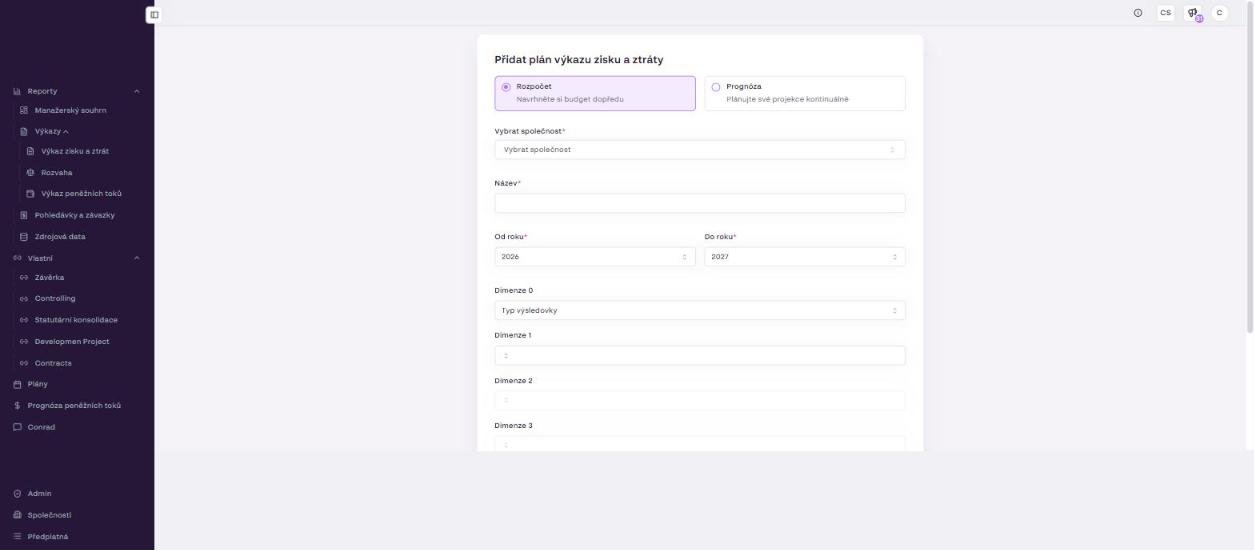
- Click + Add plan. The Add income statement plan form opens.
- Choose the plan type: Budget (“Design your budget in advance”) or Forecast (“Plan your projections continuously”).
- Fill in Select company, Name, From year and To year.
- Set Dimensions 0–4 (see below).
- Click Save. The plan detail opens.
Plan type
| Type | Use |
|---|---|
| Budget | For a fixed budget for a given period. |
| Forecast | For continuously updated projections. |
Important: both budgets and forecasts are always set for a fixed calendar period (whole years from From year to To year).
Basic parameters
| Field | Required | Description |
|---|---|---|
| Select company | Yes | The company you create the plan for. A plan is always tied to one company. |
| Name | Yes | Any name identifying the plan (for example Budget 2026). |
| From year | Yes | The first year of the plan (options 2021–2031), typically the last closed year so that you also see history. |
| To year | Yes | The last year of the plan (options 2026–2036). |
Setting the dimensions
Dimensions define the structure (row hierarchy) of your plan. Five dimensions are available:
- Dimension 0 defaults to Income statement type (Revenue / Costs). One of the dimensions must always contain Income statement type, otherwise the plan cannot be saved and data without an assigned income statement type is not displayed.
- Dimensions 1–4 are optional. Choose: Empty, Account, Activity, Cost center, Company name, Project, Income statement category, Income statement subcategory, Income statement subcategory 2 or Income statement type.
Example: Dimension 0 = Income statement type, Dimension 1 = Income statement subcategory, Dimension 2 = Cost center. The plan table then has the hierarchy Income statement type | Income statement subcategory | Cost center. Leave unused dimensions set to Empty.
Plan detail
After saving, the plan detail opens. In the header you find:
- Scenario – switching between the plan scenarios (default
Main). - Closed period – the month up to which the data is actuals (for example
09/2026). Months up to this date are marked Actual in the table and cannot be edited; you plan from the following month on. - Transaction materiality level – the amount below which small items are grouped to keep the plan readable.
- KPI tiles: Revenue, Planned revenue, Costs, Planned costs, Actual net profit, Planned net profit.
- The Compare with actuals toggle and the buttons Expand all, Collapse all, Level, Comments (0) and Add row.
- A table with the hierarchy according to the chosen dimensions and columns by month; at the end the Intercompany level row.
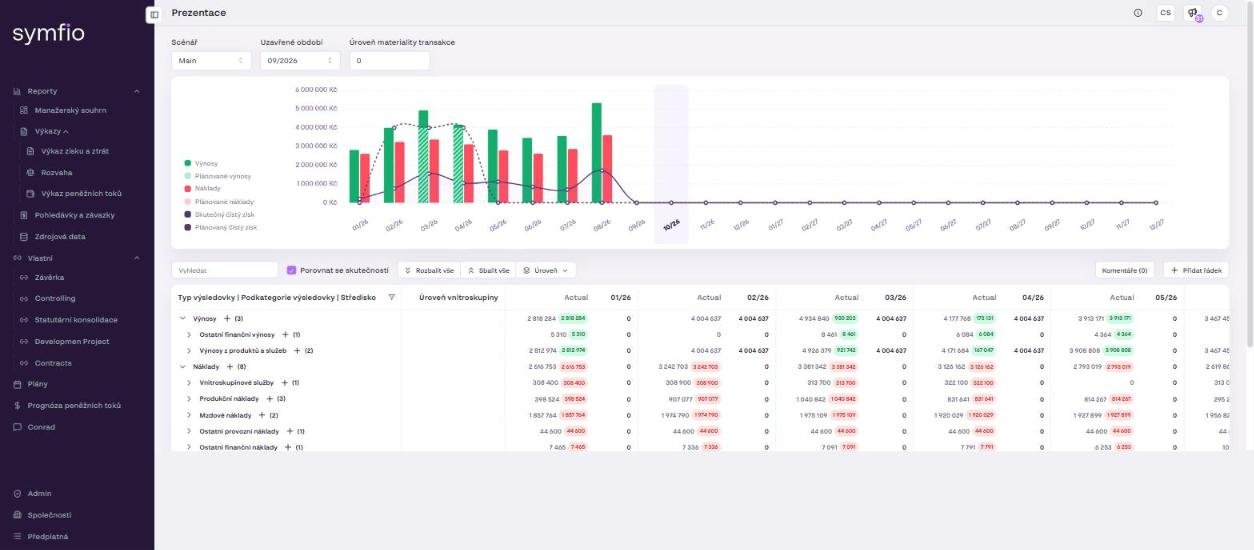
Notice in the table: “Data without an assigned income statement type is not displayed”. If some accounts have no Income statement type in the mapping, they appear neither in the plan nor in actuals. Complete the mapping under Categorization › Mappings.
Adding rows to the plan
A new plan has an empty table. You add the revenue and cost rows manually:
- Click Add row.
- In the dialog fill in the values for all dimensions of the plan one by one.
- In the Income statement type field choose Revenue (to plan income) or Costs (to plan expenses).
- Confirm with Add row.
Creating a new dimension item
If the item you need (for example a cost center or activity) does not exist in the list, create it directly in the dialog:
- Type the name of the new item into the dimension search field.
- Click the + button next to the field.
- Fill in the ID and Name of the new item.
- Confirm with Add and finish adding the row.
Tip: each row represents one combination of dimensions into which you enter monthly values. For a complex plan create separate rows for revenue and costs of each combination (for example cost center + account).
Entering planned values
After adding rows the table shows a hierarchical structure according to the configured dimensions. You enter values directly into the cells at the lowest level of the hierarchy, and only in planned months (columns not marked Actual).
- Click the cell of the respective month.
- Enter the planned value in the company currency (for example CZK).
- Move to the next cell or confirm with Enter.
- When you finish editing, save the plan (Save plan button).
Values are summed automatically into the higher levels of the hierarchy and feed the Planned revenue, Planned costs and Planned net profit KPI tiles above the table.
Comparing with actuals
- Switch on the Compare with actuals toggle above the table.
- The table shows Actual columns with the real values from accounting next to the plan.
- Differences between plan and actuals are colour-coded (red = overspend, green = saving).
For readability use Expand all / Collapse all or Level, which expands the table only to the selected hierarchy level.
Plan comments
You can add comments to individual plan items to explain variances or leave notes for colleagues.
- Click Comments (0) above the table (the number shows the comment count).
- Write the comment into the text field.
- Confirm with Add.
Working with scenarios
Each plan can contain several scenarios. Scenarios let you compare different variants of the plan, for example optimistic, pessimistic and realistic. You switch between scenarios in the Scenario field in the plan header; each scenario is edited independently of the others.
- Click the Scenario drop-down in the plan header.
- Select + Add scenario.
- Enter the name of the new scenario.
- Optionally enable Copy scenario to copy values from an existing scenario.
- Confirm with Add scenario.
Tip: use copying when creating alternative scenarios. You save time and only adjust the values that differ.
The plan in the Income statement
A saved plan is automatically reflected in Reports › Statements › Income statement. Each month there has three columns:
- Actual (SKT) – actuals from accounting,
- Plan (PLN, “Plan / Main”) – the plan value in the selected scenario,
- Δ (“vs Plan / Main”) – the difference of actuals against the plan in absolute terms and in percent; positive values in green, negative in red.
In a custom report you choose the scenario the actuals should be compared with (see Creating a custom report).
Saving and managing plans
- When you finish editing, save the plan with Save plan.
- To return to the list use the Back to income statement plans link.
- Delete a plan with the bin icon on the right of its row in the plan list.
Warning: deleting a plan is irreversible. All its scenarios and entered values are deleted together with the plan.
Frequently asked questions
Can I change the dimension structure after creating the plan?
No, dimensions are set when the plan is created and cannot be changed afterwards. If you need a different structure, create a new plan.
How often are actual values updated?
Actuals are updated automatically with every refresh of accounting data from the data source. The time of the last refresh is shown at the bottom of every report (Accounting data update).
Can I export the plan to Excel?
Plan data is also available in Reports › Source data on the Financial plan tab, which has an Export button. You can also export plan values next to actuals from the Income statement with the Export data icon.
Why do I not see some accounts in the plan?
Only data with an assigned Income statement type is displayed. Check the account mapping in the company detail under Categorization › Mappings.